The following procedure assumes that the machine to be connected to the Department’s wireless network is running Windows 8.1 or later and uses Windows built-in wireless zero configuration service to configure the connection. The example below used Windows 10, but the screens and prompts will be similar for other Windows versions.
Important Note: Access to the CUED wireless network is controlled on a per user basis and before access is granted a request for network access form must first be completed and submitted for consideration.
- Open Control Panel by pressing the Windows and S keys together to bring up the Windows Search dialogue box. Type control panel into the search box to display any matching results:
- From the list of results click on Control Panel to open it.
- Select Network and Internet and then Network and Sharing Center.
- Select Setup a new connection or network from the list of options followed by the Manually connect to a wireless network option and then click Next.
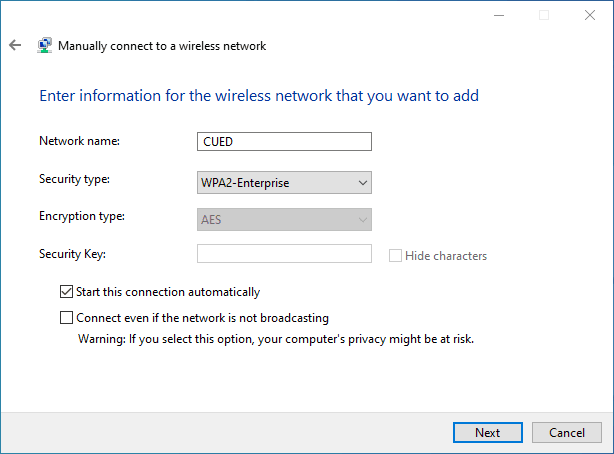
- For the Network Name enter CUED and for Security type select WPA2-Enterprise from the drop down list with Encryption type set to AES.
- The Start this connection automatically option should be selected. It is not necessary to select the Connect even if the network is not broadcasting option:
- Click Next and you should see a screen informing you that the wireless network has been successfully added.
- Click Change connection settings to open the Wireless Network Properties dialogue box.
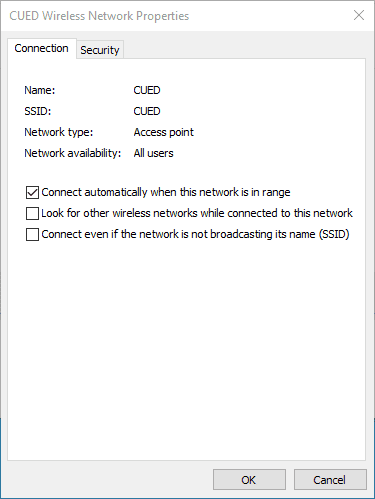
- On the Connection tab Connect automatically when this network is in range should be selected. Optionally you may wish to select the option to Look for other wireless networks while connected to this network. It is not necessary to select the Connect even if the network is not broadcasting its name (SSID) option:
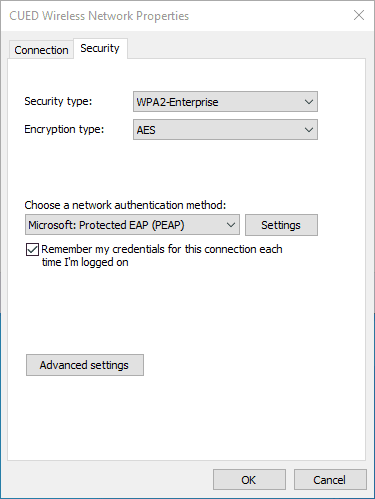
- Click on the Security tab where Security type and Encryption type will already be set correctly as the result of a previous step.
- In the drop down list for Choose a network authentication method select Microsoft: Protected EAP (PEAP). The option for Remember my credentials for this connection each time I’m logged on should also be selected:
- Click Settings next to the Microsoft: Protected EAP (PEAP) selection to open an additional Protected EAP Properties dialogue.
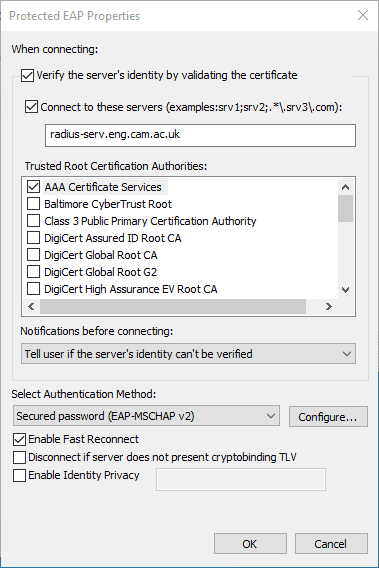
- In the When connecting section the Validate server certificate and Connect to these servers options should be selected with
radius-serv.eng.cam.ac.ukentered into the server field.
In the list of Trusted Root Certification Authorities select AAA Certificate Services. Note: If AAA Certificate Services is not listed, see the certificate troubleshooting section here. - In the Notifications before connecting drop down list the Tell the user if the server’s identity cannot be verified option should be selected.
- In the Select Authentication Method section Secured password (EAP-MSCHAP v2) should be selected from the drop down list.
The Enable Fast Reconnect should be selected but the remaining options do not need to be selected:
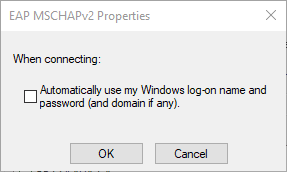
- Click Configure next to the Secured password (EAP-MSCHAP v2) selection to open the EAP MSCHAPv2 Properties and make sure that the Automatically use my Windows logon name and password option is not selected:
- Click OK to close the EAP MSCHAPv2 Properties dialogue.
- Click OK again to close the Protected EAP Properties dialogue.
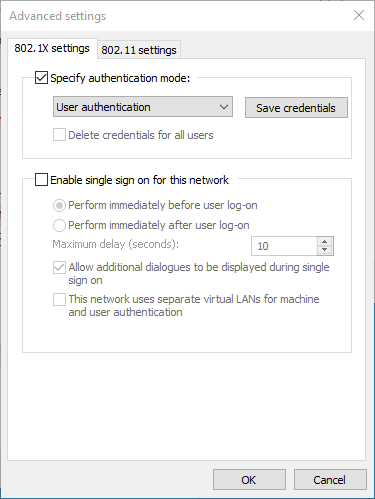
- Click Advanced settings on the Wireless Network Properties page and then on the 802.1X settings tab select Specify authentication mode followed by User authentication in the drop down list. The Enable single sign on for this network should not be selected and settings on the 802.11 settings tab can be left at their default:
- Click OK to close the Advanced settings page.
- Click OK to close the Wireless Network properties settings page.
- Click Close on the Manually connect to a wireless network screen to complete the wireless network configuration.
- Click on the network icon in the Notification Area, usually at the bottom right of the screen near the clock, to open the list of available networks.
- If the wireless network is within range you should be able to select it from the list of networks. The option to Connect automatically should be selected as a result of a previous step.
- Click Connect to continue.
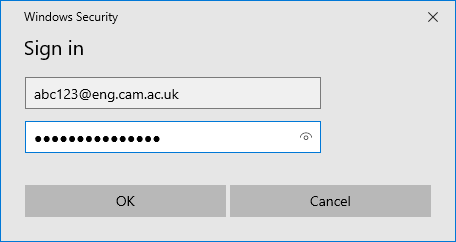
- You will now be prompted to Sign in. For the user credentials enter your CRSid followed by
@eng.cam.ac.ukas the User name and your central Engineering Department password, sometimes referred to as the Teaching System password, for the Password:
- Click OK to continue.
- You will then see a message indicating that Windows is Checking network requirements before the connection is established.
- Click anywhere outside of the Networks list to finish.

 Computing help and support